
Let’s talk about building a student feedback plan. What do I mean by a student feedback plan? Let me break down my thought process. I think we can all agree that giving student’s feedback is essential and is one of the most critical aspects of effective teaching and learning…But what does this feedback look like on a daily or weekly basis? Do you have a structured way in which you provide feedback?
I want us to think intentionally about how we can provide feedback to our students. As we are creating our lessons, assignments, and assessments, are we thinking about how and when students will get feedback. This is what I mean by having a feedback plan. If we agree that it is important and essential, we need to be intentionally weaving it into our unit or lesson planning.
Building Blocks To Consider
1. Feedback Types
As teachers, one of the first considerations in the feedback planning process is to think about the different types of feedback we can give our students. There are a multitude of choices available and I want to highlight a few of them.
- Feedback focused on a learning objective/goal: We should never surprise students with feedback that may blindside them. Directions need to be clear and the skills or objectives students will be assessed on need to be made available before they start the assignment, project or activity. When we are leaving feedback to our students, we should be using the skills, objectives, or goals that were presented as our anchor for specific, student-friendly feedback.
- Feedback focused on being timely and actionable: We should be giving students feedback when they need to improve their learning. This may occur in many places prior to any graded assignment or assessment. We need to consider the feedback checkpoint opportunities we give our students and in turn, make that feedback actionable by allowing students to revise what they have previously learned.
- Feedback focused on students strengths and areas for improvement: When we provide feedback on a student’s learning progression, we should focus on their strengths. It is important that we reveal what they understand. If we provide several checkpoint opportunities, we can establish a record of a students ongoing learning progression. We can focus our feedback on the changes students make from previous learning.
- Feedback focused on students needs and ongoing support: Be ready to provide strategies and support to students when feedback is given on areas they need to improve on. This is such a big part of the teaching process. We must guide students in the right direction in order for them to take the necessary steps to revise their learning. This feedback needs to be specific and written or spoken in a student-friendly way. We may want to consider providing additional resources on a class website or on our LMS to aid the support procedures for our students.
2. Feedback Stages
Now that we have identified a few key types of effective feedback, the next step in our building process is to organize our feedback types into three stages.
- Stage #1: In this stage, we make sure that the students know and understand what they will be given feedback on. We need to be be crystal clear what the objectives are and what students will be assessed on. If you are using a rubric, give it to the students before they begin the learning process. Spend some time reviewing and discussing the criteria and expectations that are on the rubric. Give students the opportunity to ask questions and clarify any misconceptions they may have. This stage should ensure that students will not be blind-sided by any feedback they receive in stage #2.
- Stage #2: This stage is about the learning progression of the student. This is where we need to intentionally think about when and how we are going to provide feedback to our students. Do not just ‘wing” this stage. Take a look at how long you will give your students to complete the assignment, activity, project, or assessment and strategically plan the “feedback checkpoints”. After each feedback checkpoint, students should be given the opportunity to revise their learning which occurs in Stage #3.
- Stage #3: This stage is about the students next steps after they have received feedback and the support system that is in place to make this happen. Unfortunately, teachers have the tendency to give feedback after the final product has been turned in. This is too late and does not provide students the opportunities to make changes to extend their learning. This is precisely why making a feedback plan is so important. When we allow time for checkpoints and then give students strategies and the support they will need to make the necessary adjustments, we are creating an effective learning situation for them.
3. Feedback Workflow
When we develop our feedback plan, we need to consider what the teacher and student workflow will be comprised of. Sometimes the plans we make appear to be great on paper, but the amount of time it takes to see it through is too daunting. When we institute something new and it turns out to take an enormous amount of time, we may decide to stop doing it. Giving feedback is too important to stop doing it, so we need to have ideas and resources at our disposal to help maintain a sensible workflow.
I have developed feedback templates in Google Slides & Docs with the idea of trying to cover different parts of your feedback plan. I feel if we have an array of resources available to us, we can easily plug them into the different situations that may arise in our plan. Below are images, links to create a copy, and ideas in how they can be used inside of your feedback plan.
Template #1: Feedback Progression
** Link To Create a Copy: https://bit.ly/2NY4sSL
This template is a good option if you have multiple feedback checkpoints built into your plan. I have created a version for Google Slides and Google Docs. If you have a an assignment or activity that you already have your students do in Slides or Docs, these templates can easily be added. The students will be able to see or hear their feedback with out having to leave the assignment or activity they are working on. You can certainly use these templates for anything you are grading using a rubric or learning objectives.
Students should have access to the full rubric that contains the skills/criteria they will be assessed on along with the descriptors. I would just add the skills/criteria in the left-hand column. On the Google Docs template, teachers can leave feedback by highlighting the “feedback checkpoint” text and inserting a comment. They could also use the “Mote” chrome extension to leave audio feedback. On the Slides template, teachers have the same options as there were in the Docs template or they could use the Record to Slides Chrome extension that will allow for video feedback.

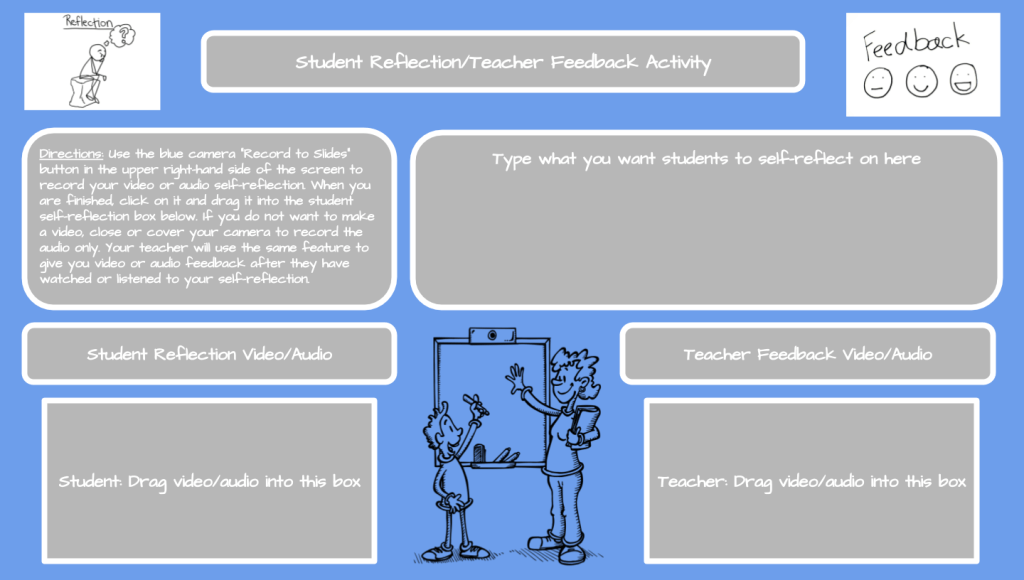
Template #2: Student Reflection/Teacher Feedback
** Link To Create a Copy: https://bit.ly/3oOTIDn
This template may be best used if you are only having one checkpoint in your feedback plan. Students have the opportunity to reflect on where they are at in their learning and the teachers would provide feedback on that reflection. The template was created in Google Slides, so all of the feedback options available for the first template would work on this one as well.
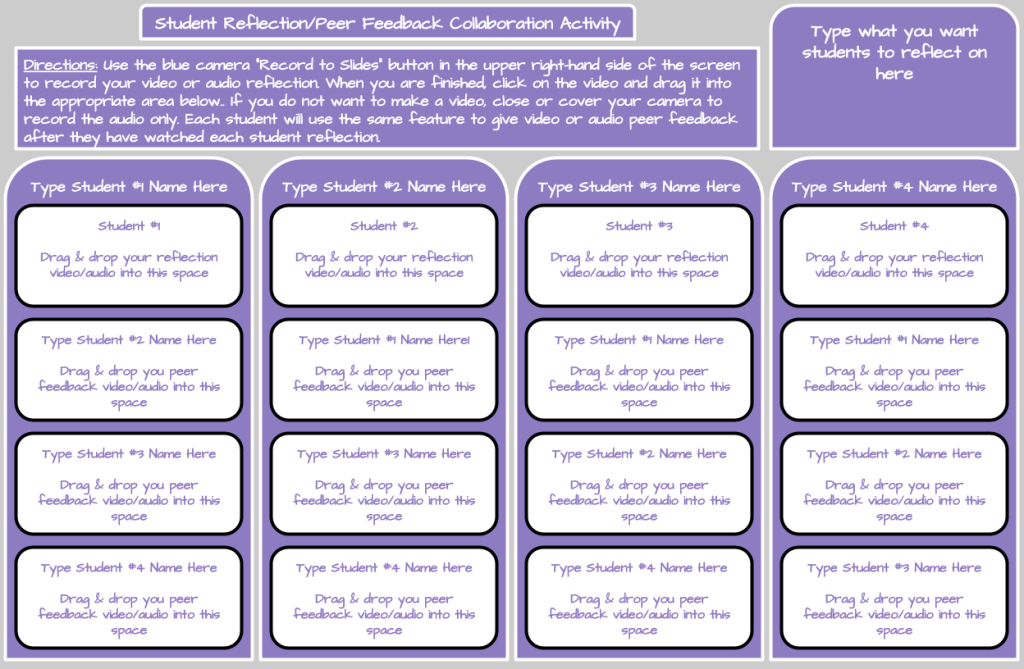
Template #3: Student Reflection/Peer Feedback
** Link To Create a Copy: https://bit.ly/2MX7HZX
Sometimes it is difficult for a teacher to provide feedback to every student for every assignment or activity. One of the best ways to take something off of your workload plate is to have students give peer feedback. We may have to spend some time upfront onboarding our students on giving effective feedback. This will be well worth the time investment. On the template below, students can insert a video using the Record to Slides Chrome extension explaining what they know or where they are at in their learning.
This template would be shared between 2-4 students. Students would watch each others videos and then leave peer feedback on the same document using the Record to Slides feature. This gives each student the opportunity to listen to multiple feedback perspectives on their videos.
Template #4: Peer Feedback
** Link To Create a Copy: https://bit.ly/3e7gDHR
This template is similar to the template above, but only allows for 2 students to give peer feedback. There are 3 options available to students in how they can share their learning. Peers may leave feedback in video or audio format or teachers could print off the template and use it as a paper and pencil offline activity.

EdTech Tools For Quick Feedback
There are different ways to give students feedback other than doing it on a template. I reached out to my district Instructional Technology coach team and Twitter PLN and asked about their favorite EdTech tools to leave feedback for their students. I am sure you are familiar with some of the tools listed below, but if you are not, spend some time checking them out to see if they would be a good fit for your feedback plan.
We should always be leveraging technology to make what we want to do more effective and efficient. There are multiple ways to offer feedback, we just need to find what will work best for us and our students.
Check out the list of feedback EdTech tools.
- Google Apps Comment Feature (Text Feedback)
- Flipgrid (Video or Audio Feedback)
- Video/Audio Notes/Comment in Schoology (Options similar to these are available in Google Classroom, Seesaw, and other LMS)
- Mote (Audio Feedback in Google Docs/Slides)
- Screencastify/Loom (Screen sharing video creators)
- Kiddom (Text, Audio, & Video Feedback)
- Pear Deck (Text Feedback)
- Go Formative (Text Feedback in real time)
Create a culture of giving feedback and time for students to revise their learning. Balance your feedback plan with a mixture of teacher and peer feedback. Thinking intentionally about how you plan your students to get feedback will give them the incentive to rework their understanding as they are progressing through their learning.

Leave a comment